
Creating Sketches in the Sketching Environment-II
Drawing Sketched using Individual Lines and Arcs
Drawing Individual Line:
To invoke the line tool for creating Sketches following are the two ways:
Ribbon: Home > Direct Sketch > Sketch Curve > Line
Menu: Insert > Sketch Curve > Line
NX also allows you to draw individual lines. This can be done using the Line tool. The working of this tool is similar to the working of the line mode of the Profile tool. The differences between Profile and Line is that line tool allows you to draw only single line at a time. As a result, after you specify the endpoint of the line, no continues line is displayed. Instead, you are prompted to specify the first point of the line. You can specify the first point and the second point of the lines by picking points on the screen or by entering values in the dynamic input boxes. We can create as many individual lines as required using this tool.
Drawing Arcs:
To invoke the arc tool for creating Sketches following are the two ways:
Ribbon: Home > Direct Sketch > Sketch Curve > Arc
Menu: Insert > Sketch Curve > Arc
NX allows us to draw arcs by using two methods. You can select a method by choosing its respective button from the Arc dialog box that will be displayed when you invoke the Arc tool. The following are the methods of drawing arcs:
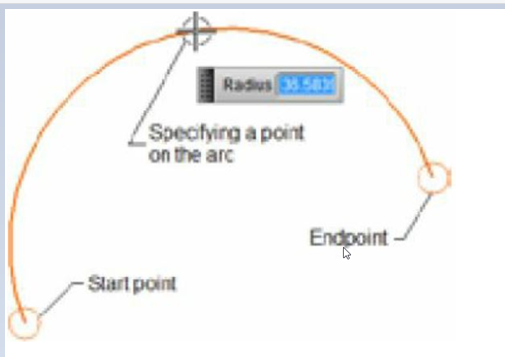
Drawing Arcs Using Three Points:
In this method, we can create an arc by specifying three points viz. start point of an arc, endpoint of an arc, and a point on an arc. This method of drawing the arc is by default activated when we invoke the Arc tool, and we will be prompted to specify the start point of the arc. Specify the start point of an arc by clicking on the drawing window or by entering the coordinates in the dynamic input boxes. After specifying the start point of the arc, it will prompt us to specify the endpoint. We can also specify the radius of the arc by entering its value in the dynamic input box.
Creating Sketches in the Sketching Environment-I
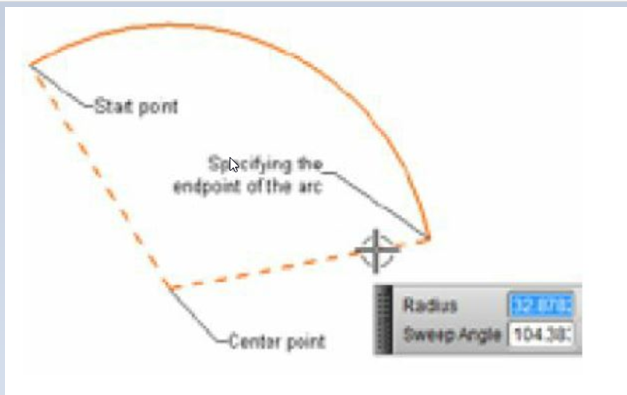
Drawing an Arc by Specifying its Center Point and Endpoints:
In this method, we can create an arc by specifying its center point first, then start point, and endpoint. To use this method of drawing the arc, choose the Arc by Center and Endpoints button from the Arc dialog box, we will be prompted to specify the center point of the arc first. Specify the center point of the arc either by clicking on the drawing area or by entering coordinates in the dynamic input boxes. While doing so, we will be prompted to specify the start point of the arc and then followed by the endpoint of the arc. Things to note here is that when we specify the start point of the arc after specifying the center point, the radius of the arc will be automatically defined. Therefore we can conclude that the endpoint is used only to define the arc length.
Drawing Circles
To invoke the Circle tool for creating Sketches following are the two ways:
Ribbon: Home > Direct Sketch > Sketch Curve > Circle
Menu: Insert > Sketch Curve > Circle
We can draw a Circle in NX using two methods. To use these methods, we can activate them by choosing their respective buttons from the Circle dialog box that are displayed when we invoke the Circle tool. The methods of drawing circles are:
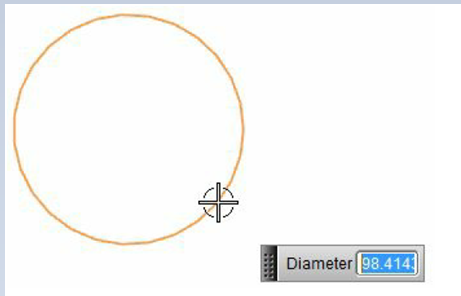
Drawing a Circle by the Center Point and Diameter:
This is the frequently used method of drawing circles. In this method, we need to specify the center point of a circle first and then a point on the circumference of the circle. The point on the circumference of the circle defines the radius or the diameter of the circle. To draw a circle using this process, choose the Circle by Center and Diameter button from the Circle dialog box. In the drawing window, specify the center point of the circle and specify a point on the circumference. Either we can enter the value of the diameter or radius in the dynamic input box.
Drawing a Circle by Three Points
Using this method, the circle is drawn by specifying three points on the circumference. To invoke or use this method, choose the Circle by 3 Points button from the Circle dialog box. It will prompt us to specify the first point of the circle, this point is actually the first point on the circumference of the circle, then specify the second point of the circle. After specifying these two points, small reference circles will be created on these two points. Now, specify the third point, which is again a point on the circle. We can also enter its diameter value in the Diameter input box. If we enter the diameter of the circle in the Diameter input box, it asks us to click on the drawing window to specify the placement point for the circle. This completes the creation of the circle.
Drawing Rectangles
To invoke the Rectangle tool for creating Sketches following are the two ways:
Ribbon: Home –> Direct Sketch –> Sketch Curve –> Rectangle
Menu: Insert –> Sketch Curve –> Rectangle
We can create a rectangle in NX using three methods. To use these methods we can choose their respective buttons from the Rectangle dialog box. The following are three methods of drawing rectangles:
Important term and definitions in NX
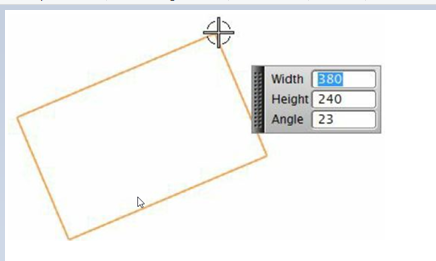
Drawing Rectangles by Specifying Corners
As the name suggests, we can create rectangle by specifying 2 diagonally opposite corner points of the rectangle. When we invoke the Rectangle tool, the 2 Corner Points button is chosen by default in the Rectangle Method area of the dialog box. After choosing this method, it will prompt us to specify the first point of the rectangle, this first point will work as one of the corners of the rectangle. After specifying the first point, it will prompt us to specify the second point to construct the rectangle. The second point must be diagonally opposite to the first point. Click anywhere on the screen to specify the second corner or we can enter the width and height of the rectangle in the dynamic input boxes.
Drawing Three Points Rectangles:
Using this method we can draw a three-point rectangle by choosing the By 3 Points method button from the Rectangle dialog box. In this method, the first two points are used to define the length and angle of one of the sides of the rectangle and the third point is used to define the height of the rectangle. When we invoke this tool, it will prompt us to specify the first point of the rectangle. After specifying the first point, it will prompt us to specify the second point of the rectangle. Both these points/corners are in the same direction. Hence, these two points define the length and orientation of the rectangle. And if we specify the second point at a certain angle, the resulting rectangle will also be at certain angle. After specifying the second point, it will prompt us to specify the third point to create the rectangle. This third point is used to define the height of the rectangle. Also make a note that after specifying the first point, we can also specify the height, width, and the angle of the rectangle in the dynamic input boxes.
Drawing Center point Rectangles:
As the name itself suggests, we can draw a rectangle by specifying the center point of the rectangle. Using this method, we can draw a rectangle using three points. Here, the first point is taken as the center of the rectangle. When we invoke this tool, it will prompt us to specify the center point of the rectangle first. Once we specify the center point, it will prompt us to specify the second point of the rectangle. Remember, both these points are in the same direction. Therefore, we can say that these points define the width of the rectangle. Also make a note that if we specify the second point at a certain angle, the resulting rectangle will also be at a certain angle. After we specify the second point, it will prompt us to specify the third point to create the rectangle. This third point is used to define the height of the rectangle. In addition to this, likewise other options of creating rectangle here also we can specify the height, width, and angle of the rectangle in the dynamic input boxes that appear after specifying the first point for creating the rectangle.
We will more post on CAD Tool–>Siemens NX in upcoming days.
Kindly provide your valuable comment on below Comment section and also have you any question kindly ask to ASK QUESTION in FORUM. Our Team will try to provide the best workaround.
Kindly subscribe your Email-Id at (http://globalplm.com/) and drop any suggestion/queries to ([email protected]).