


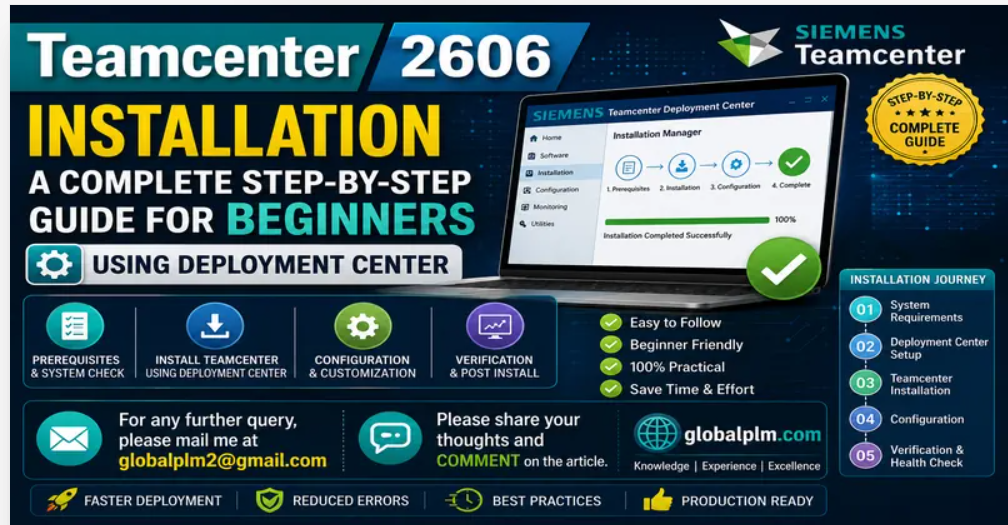
Teamcenter Installation 2606: A Complete Step-by-Step Guide for Beginners (Using Deployment Center)
If you’re new to Siemens Teamcenter and staring down the idea of installing it for the first time, take a breath — it looks intimidating because it’s not “one program,” it’s several pieces working together: a database, a license server, an application server, and a web interface. Once you see how those pieces connect, the installation itself is really just a checklist.
This guide walks through Teamcenter 2606 installation from scratch using Deployment Center (DC) — Siemens’ current recommended installer — covering what you need before you start, what software to download, every major step, and how to confirm the right services are actually running at the end.
What Is Teamcenter 2606?
Teamcenter 2606 is one of Siemens’ latest releases in its ongoing PLM (Product Lifecycle Management) platform. Each Teamcenter release is named by year and month — so “2606” means the release delivered around June 2026. This release continues Siemens’ push toward tighter integration between engineering, requirements, and quality processes, connecting tools like Polarion for requirements management and SAP for quality inspection planning more closely than before.
Why Deployment Center Instead of TEM?
If you’ve read older Teamcenter tutorials, you’ve probably seen Teamcenter Environment Manager (TEM) described as the installer. TEM still exists, but for 2606 — and really for every recent release — Siemens steers new installations toward Deployment Center instead.
The simplest way to think about the difference: TEM installs one server at a time, with you clicking through each screen manually. Deployment Center is a web-based control panel that sits on top of the same installation logic, but lets you define an environment once, save that configuration, and reuse or repeat it across multiple servers — development, test, training, production — without redoing the manual steps each time. For a single beginner install the two get you to the same place, but DC is where Siemens’ own tooling and documentation are headed, so it’s worth learning it directly rather than learning TEM first and switching later.
Before You Start: Prerequisites
Don’t skip this section — most failed installations trace back to something missed here.
1. Hardware Requirements
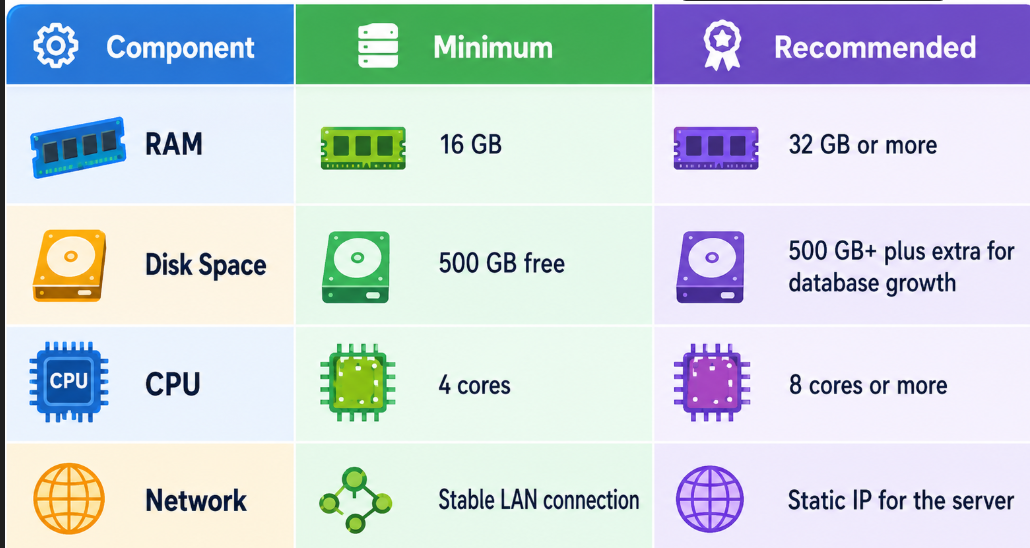
A production environment will need more than this — but for a beginner setting up a learning or test environment, these numbers are a safe baseline.
2. Operating System
Teamcenter supports both Windows Server and Linux (Red Hat Enterprise Linux is the common choice on the Linux side). Pick one and be consistent — mixing OS assumptions mid-install is a common beginner mistake. This guide assumes a Windows Server environment, since it’s the most common starting point for beginners, but Deployment Center works the same way conceptually on Linux (using .sh scripts instead of .bat).
3. Accounts and Permissions
-
A Windows account with local administrator rights on the server
-
A dedicated Teamcenter service account (don’t install under your personal admin login — this causes headaches later when that person leaves or their password changes)
-
Database administrator credentials, if your DBA team is separate from you
-
A username and password you’ll set up as the Deployment Center admin (dcadmin) during DC’s own install
4. Network and Ports
- Make sure the firewall allows the ports Deployment Center’s web console, the Teamcenter web tier, FMS, and the database will use
- If antivirus software is running, exclude the Teamcenter and Deployment Center installation directories — antivirus scanning mid-install is a classic cause of corrupted installs
Software You’ll Need
Gather these downloads before you start, so you’re not hunting for installers halfway through:
- Deployment Center software package and the Teamcenter 2606 deployment pack — both from Siemens Support Center (GTAC), requires a valid Siemens support login
- Database software — either Oracle Database (commonly used for larger enterprise deployments), or Microsoft SQL Server (common for small-to-mid deployments and easier for beginners on Windows)
- Java Development Kit (JDK) — a supported version as specified in the Teamcenter 2606 release notes; Deployment Center itself also needs JAVA_HOME set before it will install
- Siemens Common Licensing (SPLM License Server) — required to activate Teamcenter
- .NET Framework (Windows only) — required by several Teamcenter Windows components
- A web browser — Chrome or Edge, both for the Deployment Center console and for testing Active Workspace once installed
Keep all of these in one folder on the server so Deployment Center can find the deployment pack easily when you load it in.
Step-by-Step Installation
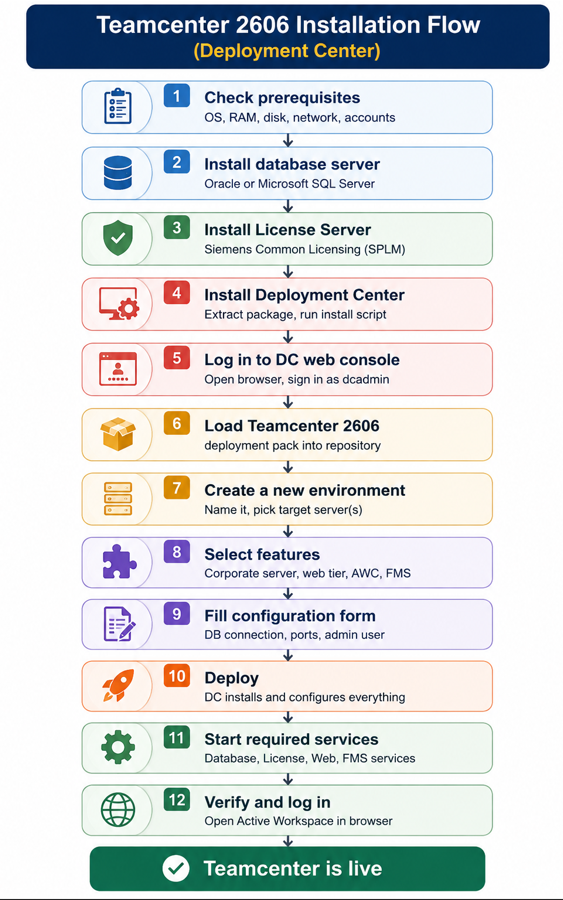
Step 1: Install and Configure the Database
Install Oracle or SQL Server first, since Teamcenter needs a working database to install into. During setup:
- Create a dedicated database instance for Teamcenter (don’t share it with unrelated applications)
- Note down the instance name, port, and credentials — you’ll enter these into Deployment Center later
Step 2: Install the License Server
Install Siemens Common Licensing and load your Teamcenter license file (provided by Siemens or your reseller). Test that the license server starts correctly before moving forward — a broken license server will block later steps from completing successfully.
Step 3: Prepare the Server Environment
- Install the JDK and set the JAVA_HOME environment variable
- Install .NET Framework (Windows)
- Create a base directory for Deployment Center itself (e.g. C:\Programs\Teamcenter\DeploymentCenter)
Step 4: Install Deployment Center
Unzip the Deployment Center package and open a command prompt as administrator in that folder. Run the install script with your chosen settings, for example:
- Extract the Installation Files
- Unzip the Deployment Center software package and navigate to the deployment_center directory.
- Configure Installation Properties
- Locate the install_config.properties file (this contains settings for installation).
- Make a copy of this file (e.g., DC_install_config.properties) for customization.
- Edit the file in a text editor and set required parameters (e.g., server directory, ports, user credentials).
- Save the file after making necessary changes.
Run the Installer:
Windows:
bash
CopyEdit
deployment_center.bat -install -inputFile=DC_install_config.propertiesLinux:
bash
CopyEdit
deployment_center.sh -install -inputFile=DC_install_config.properties
Adjust the paths, ports, and credentials to fit your environment — don’t leave the example password as-is. When the install finishes, it prints the URL where Deployment Center is running, and creates two Windows services (the DC server and DC service) so it starts automatically going forward.
Step 5: Log In to Deployment Center
Open a browser and go to the URL from the previous step (something like https://your-server:8080/deploymentcenter). Log in with the dcadmin credentials you just set.
Step 6: Load the Teamcenter 2606 Deployment Pack
Inside Deployment Center, add the Teamcenter 2606 deployment pack to your repository — this is the package containing the actual Teamcenter installables (corporate server, web tier, Active Workspace, FMS). Point DC at the folder where you saved your downloads, and it indexes what’s available to install.
Step 7: Create a New Environment
In the DC console, start a new environment and give it a name (e.g. “TC2606-Dev“). An environment in DC represents one complete Teamcenter install — the server or servers it’ll live on, and every component you choose to include.
Step 8: Select the Features to Install
Choose the components for this environment:
-
Corporate server (the core Teamcenter application)
-
Web tier
-
Active Workspace client
-
FMS (File Management System)
For a beginner’s first install, selecting all of these on a single server keeps things simple.
Step 9: Fill In the Configuration Form
Deployment Center walks you through configuration screens for each selected component — this is where you provide:
-
Database type and connection details (from Step 1)
-
License server address (from Step 2)
-
Web tier port and admin user creation
-
FMS storage location
This step covers the same ground TEM’s screens used to cover — DC just presents it as a guided web form instead of a desktop wizard.
Step 10: Deploy
Once the configuration is complete, click deploy. Deployment Center runs the actual installation in the background, installing and configuring each selected component in sequence. This can take a while depending on server speed — let it finish without interrupting it, and watch the live log in the DC console if you want to follow along.
Step 11: Start All Required Services
With everything installed, start the services in this order:
- Database service
- License server service
- Teamcenter corporate server service
- Web tier (Tomcat) service
- FMS (FSC) service
Step 12: Verify and Log In
Open your browser and navigate to your Active Workspace URL (typically something like http://<servername>:<port>/tc/webclient). Log in with the admin account created during the Step 9 configuration. If you see the Teamcenter home page, the installation succeeded.
Confirming the Right Services Are Running
Don’t just assume things worked because Deployment Center reported success. Check manually:
On Windows, open Services (services.msc) and confirm these are set to “Running”:
- Teamcenter Corporate Server
- Teamcenter Web Tier (Tomcat service)
- FMS FSC service
- Siemens License Server (SPLM)
- Your database service (Oracle or SQL Server)
- TCDCService (Deployment Center’s own service — worth keeping running if you’ll manage more environments later)
From the command line, check the web tier log files (catalina.out for Tomcat, or the equivalent Windows log) and Deployment Center’s own logs (typically under DC-root\deployment_center\webserver\logs\) to confirm there are no startup errors — a service can show as “Running” in Windows while still throwing errors internally, so the logs are worth a quick look the first time.
Common Beginner Mistakes to Avoid
-
Installing under a personal admin account instead of a dedicated service account — causes permission issues down the line
-
Skipping the license server test before configuring Deployment Center — you’ll waste time troubleshooting the wrong thing later
-
Running antivirus scans during install — can corrupt files mid-copy
-
Leaving default DC credentials unchanged — change dcadmin’s password from any example value before going further
-
Not documenting your database and admin credentials somewhere secure — you’ll need them again for upgrades and troubleshooting, and for creating new environments later
Wrapping Up
Installing Teamcenter 2606 isn’t difficult once you understand it’s really five layers stacked on top of each other: database, license server, corporate server, web tier, and the Active Workspace client sitting on top. Deployment Center just changes how you drive that installation — a web console guiding you through configuration instead of a desktop wizard — the underlying pieces you’re standing up are the same. Get each layer running and verified before moving to the next, and the whole install becomes a lot less mysterious.
If you’re setting this up for practice or a learning environment, don’t worry about getting it perfect on the first attempt — reinstalling and troubleshooting is how most PLM administrators actually learn this system.
==============================================
Globalplm AI Assistant
Please click on this icon and start asking question.
Published article
Teamcenter Microservices Architecture Explained: From Monolith to Containers
Teamcenter 2606: Complete Guide to New Features and Enhancements
https://globalplm.com/teamcenter-2606-top-50-qa/
https://globalplm.com/category/teamcenter/
Understanding the Role of Artificial Intelligence in Teamcenter PLM
Top 50 Teamcenter Active Workspace Interview Questions and Answers (2025)
=========================================================================
What’s Next? We have more deep dives into PLM Tutorials, Teamcenter, and Active Workspace coming your way soon.
We value your feedback! Please share your thoughts in the comment section below.
If you have specific technical questions, feel free to post them in our Forum via the “Add Topics” button, and our team will provide a solution as soon as possible.
Stay Connected:
Follow us on our social media platforms for the latest updates, or
reach out with suggestions at [email protected].
[Facebook] | [LinkedIn] | [YouTube] | [WhatsApp +91-9545389857]
— Team GlobalPLM